Monday 26 March 2012

Conclusion - Getting Started with Dreamweaver CS5 - PART 7


Before we end this tutorial series on Dreamweaver CS5, let's take another look at the first file that we created. In the Files panel, make sure that your Learning Dreamweaver site is selected, and then double-click on the index.html file to open it.

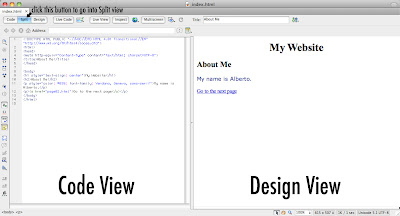
Once it's open, click on the Split button in the Document window to switch to the Split view. This view shows us both the Code view and the Design view at the same time.


On the right side we have the Design view, which shows the elements of the webpage as you would normally see them in a browser (although it's still best to preview your document in a browser as some things will appear differently in the Design view).

On the left side we have the Code view, which also shows us the elements of our web page, but shows it to us in the form of HTML code. HTML code is made up of the instructions that tell the browser how to display the contents of a web page. It uses what you call HTML tags to classify elements so that the browser knows how to display them. These tags are always there, even if we're not aware of it. While we create things in the Design view, Dreamweaver is quietly adding them for us.

Without going into too much detail, here are some of the most commonly used HTML tags. Try to see if you can spot them in the HTML documents that we've created thus far.

Some commonly used HTML tags:
  • h1 - used to define a first heading
  • p - used to define a paragraph
  • a - used to define a link
  • img - used to define an image

But even though Dreamweaver lets you create web pages without having to type in the HTML code yourself, it's still important that you learn the basics of HTML, because HTML is the foundation of every web page. No matter what tool you use to create a website, there is always the HTML that marks up your elements. With Dreamweaver, what you have are tools and features that let you create the HTML code without having to manually type them in. But it's still important that you understand what's going on behind the scenes; otherwise you're just blindly clicking on buttons and windows in the Dreamweaver interface. In many cases, you'll probably need to switch between the Design and Code view in order to create your webpages and fix problems that may arise. But for those of you who up until this point have been creating websites only with basic text editors, then you can probably appreciate how Dreamweaver can make things a lot easier. It has a great set of tools and features that make the process of creating websites much more efficient, and what you've seen in this introductory tutorial series is just a small fraction of Dreamweaver's capabilities.

Thank you for reading this tutorial series. I sincerely hope that you learned a few things. If you know others who might benefit from reading this series, please feel free to share it with them.

For those of you who want to start learning HTML, I recommend the HTML tutorials by w3schools as a good place to start.

And that concludes this Getting Started with Dreamweaver CS5 tutorial series.
Inserting an Image - Getting Started with Dreamweaver CS5 - PART 6


In this part of the tutorial series on Dreamweaver CS5, we'll learn how to insert an image in an HTML document.

Step 1
Create a new HTML document by choosing File > New. The New Document dialog window will come up. Select the Blank Page category and select HTML under the Page Type column. Under the Layout column, select <none>. For the DocType, choose HTML 4.01 Transitional.


Then click on Create.


Step 2
Save this document inside your learn-dw folder as insert-image.html


Step 3
When the new blank document comes up, type the words Here is a picture of some leaves in the Design view of your Document window and hit enter.


Step 4
To add an image, choose Insert > Image from the main menu.


Step 5
When the Select Image Source window comes up, navigate to the leaves.jpg file inside the images folder of your learn-dw folder, and select it. For the Relative to option, choose Document.


Then click the Choose button.


Step 6
The Image Tag Accessibility Attributes dialog box will come up after you click Choose. Type leaves in the Alternate text input field, and just leave the Long description field blank.


The alternate text allows you to specify a word or phrase that briefly describes the image. And if for some reason the image fails to load when someone visits the page, this alternate text will be displayed in place of it. The long description allows you to specify an address to a web page that has a more detailed description of the image. Choosing not to provide an alternate text or a long description for an image is fine.

Click OK. You should now see the image inserted in the document.


Step 7
Save your work and preview it in a browser.


In the next part, I'll share some final thoughts to conclude this tutorial series.

Previewing a Webpage in a Browser - Getting Started with Dreamweaver CS5 - PART 5


A webpage browser is an application that is used to view webpages. Some popular webpage browsers include Firefox, Chrome, Safari, and Internet Explorer.

In this part of this Dreamweaver CS5 tutorial series, we'll learn how to preview a webpage in a browser. Even though the Design view of the Document window shows you how your page looks like without the HTML tags, it's still best to preview your webpage in a browser to see exactly how the page will look like on a specific browser.

But before we preview our webpage in a browser, let's first add a title to our webpage.

Step 1
At the top of the Document window, you'll see an input field for the web page title.


Type About Me inside the title field.


Save your document by choosing File > Save.

And later on when you preview this webpage in a browser, you will see the webpage title in the title bar, which can be found at the top of the browser window.

Step 2
To preview your HTML document in a browser, choose File > Preview in Browser from the main menu. You’ll see a list of the browsers that you have in your system. Click on the name of the browser that you'd like to preview the HTML document with, and wait for the browser to load.


Step 3
Your chosen browser should now come up, and you should see it displaying your HTML document. You'll see the About Me title in the title bar, which would be at the top of the browser window. And you'll see the contents of your webpage in the browser's main body. Look for the Go to the next page link that you created, and click on it to see if it works.


Clicking on it should bring you to the page02.html file.

After testing the link, close your browser and go back to Dreamweaver. In the next part of this lesson, we’ll learn how to insert an image in Dreamweaver CS5.

Creating a Text Link - Getting Started with Dreamweaver CS5 - PART 4


In this lesson, we'll learn how to create a text link.

Step 1
Before we create a text link, let's bring our attention back to the Files panel.

In the Files panel, make sure that your Learning Dreamweaver site is still the selected site.


You should see a file named page02.html. This is the file that we will link to.


Step 2
Let's now go back to the Document window, and create our text link.

Select the Go to the next page text.


Then go to the Properties panel, and click on the HTML button to bring up the HTML properties. Look for the Point to File button. It's the button that looks like a target icon.


Press this button, and without letting go, drag it toward the Files panel. Once you start dragging, you should see an arrow that drags out along with your mouse pointer. Keep dragging until the arrowhead is on top of page02.html in the Files panel.


Once you've reached the file, release the mouse. This should successfully turn the selected text into a link that points to page02.html.


Step 3
Save your document by choosing File > Save from the main menu. We will test the link in the next part of this series when we learn how to preview a webpage in a browser.

Adding and Formatting Text - Getting Started with Dreamweaver CS5 - PART 3


In this part of the series, we'll add some text to our HTML document. But before we do that, let's take a moment to observe our blank HTML document. The window that is housing this HTML document is called the Document window.


The Document window allows you to view your HTML page in 3 ways: Code view, Split view, and Design view. The Code view shows you all the HTML code in your HTML document. HTML code makes up the building blocks of each web page, and the Code view will give you direct access to that. The Design view shows you the contents of your HTML document without the HTML code. It shows your web page and its contents in a way that's more similar to how word processors display documents. The Split view splits the Document window so that you see both the Code view and the Design view at the same time. You can switch between views by clicking on the view buttons found at the top-left of the Document window.


Let's now add some text.


Step 1
Make sure you're in the Design view by clicking on the Design view button. Once your in the Design view, type My Website on the first line of your document's body, and then press the enter key to move down to the next paragraph.


Step 2
Then type About Me, and hit enter again.


Step 3
Next, type My name is [insert your name here], and hit enter once more.


Step 4
Then type Go to the next page. We will turn this last line of text into a link later on.

So right now, your document should look like this:


Save your document by choosing File > Save.


Step 5
Now let's change the format of some of our text. Select the My Website text.


Then go to the Properties panel. The Properties panel allows you to set the properties of the currently selected element in the Document window. In the Classic layout, the Properties panel can be found below the Document window.


Once you see the Properties panel, click on the HTML button to bring up the HTML properties. Then go to the Format drop-down menu and choose Heading 1 to turn the text into a first heading.


The My Website text should now look like this:


Step 6
Next, let's center the My Website heading. Make sure that the text is still selected. In the Properties panel, click on the CSS button to bring up the CSS properties. For the Targeted Rule, choose <New Inline Style>. And then click on the Align Center button.


The My Website heading should now be aligned to the center.


CSS stands for Cascading Style Sheets. CSS lets you add styles such as color, font, alignment, borders, etc... to the elements of your webpage. We'll talk more about CSS in a future training series.

Save your document by choosing File > Save.


Step 7
Next, select the About Me text. Then in the Properties panel, click on the HTML button to bring back the HTML properties again. Then choose Heading 2 for the format.


Step 8
Next, select the My name is [insert your name here] text. Let's change the font of that text.

In the Properties panel, click on the CSS button to ensure that the CSS properties are displayed. For the Targeted Rule, choose <New Inline Style>. For the font, choose the Verdana, Geneva, sans-serif set from the Font drop-down menu.


This should set the selected text's font to Verdana.

But why does it specify more than one font?
When a browser displays text, the font specified has to be a font that exists in the web page viewer's computer. In this example, if the person viewing your web page does not have the Verdana font installed in his or her system, then the browser will use the second font in the list. If the second font is still not installed in the web page viewer's computer, then it will use the third option, and so on. So for the other fonts in the same set that come after the first one, think of them as backup fonts.


Step 9
Lastly, let's change the color. Make sure the text is still selected, and that the CSS properties in the Properties panel are still displayed. To change the font color, click on the color box in the Properties panel, and then click any color you want from the color palette that pops up.


Click on any empty space in the Document window to deselect the currently selected text. You should see that the My name is [insert your name here] text now has a different color.


Save your work by choosing File > Save.


So now that we've taken a basic look at how to add and format text in Dreamweaver CS5, let's move on to the next part where we'll learn how to create a text link in Dreamweaver CS5.

Creating an HTML Page - Getting Started with Dreamweaver CS5 - PART 2


A website is made up of different pages. These pages are usually in the file format known as HTML, which stands for Hypertext Markup Language. Let's go ahead and learn how to create a new blank HTML document.

Step 1
To create a new HTML document in Dreamweaver CS5, go to the main menu and choose File > New to bring up the New Document dialog box.


Then in the New Document dialog box, select the Blank Page category. Under the Page Type column, choose HTML. Under the Layout column, choose <none>. For the DocType, choose HTML 4.01 Transitional.


Then click on the Create button to create the HTML page.


Step 2
Now that we have our new blank HTML document, let's save it.

Choose File > Save As from the main menu to bring up the Save As dialog box. Then in the Save As dialog box, navigate to the learn-dw folder, and save this file inside it. Give the name index.html to this file.


Then click Save.

Reminder: If you're using a shared computer and other students are also completing this lesson, make sure you save it inside the learn-dw folder that belongs to you.

In the next part of this lesson, we'll learn how to add and format some text in Dreamweaver CS5.

Defining a Site - Getting Started with Dreamweaver CS5 - PART 1


When you start building your website, create a folder on your computer that will contain all the assets needed for that site. This includes the different pages, images, and other media assets that will make up your website. This folder on your computer is referred to as the local root folder of your website. Since the elements that make up a website are all related and linked to each other, it is important that you store them all in one place instead of scattering them all over different locations on your computer. Use one local root folder for each website that you plan on making.

For the first part of this series, we'll start by setting up a Dreamweaver site. Now keep in mind that setting up a Dreamweaver site does not really make a site any different from other websites created using other tools. When you set up a Dreamweaver site, what you are doing is assigning a local root folder to a specific Dreamweaver website project. This lets you take advantage of the various Dreamweaver features that will help make the process of creating your website more efficient. For this training course, we will use the learn-dw folder as our local root folder. The files needed for this training course are already included in this folder.

Let's begin.

Step 1

Launch Dreamweaver CS5.


Step 2

Let's first choose a workspace layout. The workspace layout refers to the way the windows and panels of your Dreamweaver workspace are arranged. There are a few preset workspace layouts to choose from. You can even save your own custom workspace layout.

Let's choose the Classic layout. From the main menu at the top, choose Window > Workspace Layout > Classic.


Step 3

Then go back to Window > Workspace Layout again, and choose Reset 'Classic'.

Why are we resetting the workspace layout?
This will ensure that the chosen layout is reverted back to its original appearance. Sometimes, you or someone else using the Dreamweaver application on your computer may end up moving windows and panels around, making your workspace messy and disorganized. Resetting the layout lets you quickly put everything back in the original place. If everything is in its original place, then you won't notice any changes after you reset the layout. But if things have been moved around, then you'll see your workspace layout revert back to the original arrangement.


Step 4

Let's now begin the site setup process.

To set up a new Dreamweaver site, go to Site > New Site from the main menu at the top.


Step 5

The Site Setup dialog window will come up. Give your site a name by entering one in the Site Name input text field. Let's name this site Learning Dreamweaver. I recommend that you include your name in the title as well: [Insert your name here] - Learning Dreamweaver. That way, you can easily distinguish which site is yours just in case other people are also working on this tutorial on a shared computer.


NOTE: The site name will only be used by Dreamweaver to keep track of your website project. It will not show up on your actual website.


Step 6

Next, let's assign the learn-dw folder as the Local Site Folder (this is the same thing as the local root folder). To assign the local site folder, click on the folder icon next to the local site folder input field.


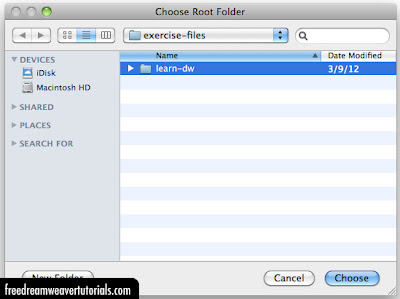
And when the Choose Root Folder dialog window comes up, navigate to where you stored the learn-dw folder and select it.

REMINDER: If you are working on a shared computer, make sure that you select your own copy of the learn-dw folder and not the folder of someone else.

If you're working on a Windows computer, click on Open, and then click on Select.

If you're working on a Mac, click Choose.


Step 7

Then back in the Site Setup dialog window, click on Save.


Step 8

After clicking on the save button, take a look at the Files panel. If you're using the Classic workspace layout, the Files panel can be found in the lower-right corner of the workspace. It's the panel that has a tab that says Files. And just below the Files tab, you will see the name of the currently active Dreamweaver site, which in this case should be the Learning Dreamweaver site that we just set up.


The Files panel allows you to manage the contents of the local root folder that you assigned to your Dreamweaver site. For this site, the local root folder we assigned is the learn-dw folder. If you look at the contents of the Files panel, right below the Local Files heading, you'll see some files and folders.


These files and folders are the ones that are contained inside the local root folder that we're using. But the Files panel did not copy the contents of the folder. Instead, it is linking to the actual folder that is on your computer. So whatever you do to the files and folders here in the Files panel (whether you move, rename, add or delete them) will reflect in the original folder. And whatever you do to the contents inside the original folder will also be reflected in the Files panel. So don't delete or move your actual local root folder. Otherwise, you'll have to edit the settings of your Dreamweaver site again in order to link to the correct local root folder.

If you have other sites that you've set up, you can switch between them by clicking on the site name in the Files panel. This will bring up a drop-down menu that shows a list of the other sites you've set up. 


And that completes this tutorial on setting up a Dreamweaver site. In the next part, we'll learn how to create an HTML page in Dreamweaver CS5.

Getting Started with Dreamweaver CS5


Welcome to Getting Started with Dreamweaver CS5. As the title suggests, this is a tutorial series that will introduce you to the Dreamweaver CS5 application. Dreamweaver CS5, which is part of the Adobe Creative Suite 5 bundle of applications, is a powerful piece of software that lets you design and manage web sites. We'll take a look at some of its tools and features in this series of hands-on tutorials.

This tutorial series comes with activity files which you can download as a zipped file by clicking on the link below. Once you extract the zip file, you will get a folder named learn-dw. This folder and its contents will be used as we go through the lessons in this training series. If you're using a shared computer, I recommend that you create your own folder with your name on it, and place the learn-dw folder in there. Here is the link to the download page:

Once you've downloaded the activity files, let's get started.